[Java] 자바 직렬화에 대해서 (Serialization)
1. 직렬화란? (Serialization)
직렬화란 자바의 객체를 바이트 스트림으로 변환하는 것을 말한다. 반대로 직렬화된 바이트 스트림을 다시 자바 객체로 변환하는 것은 역직렬화(Deserialization)라고 한다.
바이트 스트림이란? (Byte Stream)
- 데이터를 0과 1로 이루어진 이진 데이터(즉, 바이트 단위)로 처리하는 방식
- 컴퓨터에서 파일, 네트워크, 메모리 등에서 데이터를 읽고 쓰는 과정에서 사용되는 흐름
- 자바에서는 InputStream과 OutputStream 클래스를 통해 바이트 스트림을 처리함
주로 다음과 같은 상황에서 직렬화를 사용한다.
- 객체를 파일에 저장하여 나중에 재사용하고 싶을 때
- 네트워크를 통해 객체를 전송할 때
- 분산 시스템에서 객체를 원격으로 주고 받을 때 (예시 : RMI)
RMI란? (Remote Method Invation)
다른 실행 환경에 있는 객체의 메서드를 로컬에서 생성한 객체의 메서드와 다름 없이 호출할 수 있도록 하는 자바의 분산 객체 기술
(1) Serializable 인터페이스
객체를 직렬화하기 위해서 Serializable 인터페이스를 구현해야 한다. 이 인터페이스는 아무런 내용도 없는 마커 인터페이스이다. Serializable 인터페이스를 구현하는 것만으로 객체가 직렬화되는 이유는, 자바의 내장된 직렬화 메커니즘과 관련이 있다. 내부적으로 자바의 ObjectOutputStream과 ObjectInputStream 클래스가 직렬화 및 역직렬화 과정을 담당한다. 이 클래스들이 객체를 직렬화 또는 역직렬화 하기 전 Serializable 인터페이스 구현 여부를 확인하는 것이다. 만약 Serializable 인터페이스를 구현하지 않았는데 객체를 직렬화하려고 하면 런타임 예외가 발생한다.
(2) 직렬화 기본 개념
- 클래스의 멤버 변수만 저장할 수 있으며 메서드는 저장되지 않는다.
- 멤버 변수 중에서 민감한 정보는 transient 키워드를 붙여 제외시킬 수 있다. transient 키워드가 붙은 변수는 해당 변수 타입의 기본값으로 저장된다.
- 직렬화할 클래스에 readObject(), writeObject() 메서드를 재정의함으로써 직렬화 방식을 커스텀할 수 있다.
- Serializable 인터페이스를 구현한 상위 클래스를 상속받은 모든 하위 클래스들은 직렬화 할 수 있다.
- Serializable 인터페이스를 구현하지 않은 상위 클래스를 상속받은 하위 클래스가 Serializable 인터페이스를 구현했다면, 하위 클래스가 직렬화 될 때 상위 클래스의 멤버 변수는 직렬화되지 않으며, 역직렬화 시 상위 클래스의 생성자가 호출되어 초기화된다. 이때 호출하는 상위 클래스의 생성자는 기본 생성자로, 기본 생성자가 존재하지 않으면 런타임 예외가 발생한다.
(3) SerialVersionUID
SerialVersionUID는 직렬화된 객체의 버전을 식별하는 데 사용되는 고유한 ID이다. 자바 직렬화에서 클래스가 변경되었을 때 그 클래스와 이전에 직렬화된 객체 간의 호환성을 유지하기 위해 사용된다. 따로 명시하지 않으면 컴파일러가 자동으로 생성하며 클래스의 구조가 바뀔 때마다 이 값이 달라진다. 역직렬화 시 해당 객체가 직렬화 되었을 당시의 SerialVersionUID와 현재 클래스의 SerialVersionUID 값을 비교한다. 이 값이 일치하면 역직렬화가 진행되며 다르다면 런타임 예외가 발생한다. 따로 명시하지 않으면 클래스의 구조가 바뀔 때마다 이 값이 달라지기 때문에 대부분의 경우 클래스에 명시적으로 선언하는 것이 권장된다.
private static final long serialVersionUID = 1L;2. 직렬화 예제 코드
Person.java - 직렬화할 클래스
참고로 String 클래스를 살펴보면 Serializable 인터페이스를 구현하고 있기 때문에 직렬화가 가능하다.
@Data
public class Person implements Serializable {

    private static final long serialVersionUID = 1L;

    private String name;
    private int age;

    transient private String password;

    public Person(String name, int age) {
        this.name = name;
        this.age = age;
    }

    public Person(String name, int age, String password) {
        this.name = name;
        this.age = age;
        this.password = password;
    }
}
(1) Netty
MyServer
- 객체를 자동으로 직렬화/역직렬화해주는 ObjectEncoder와 ObjectDecoder 클래스 사용
public class MyServer {

    private final int port;

    public MyServer(int port) {
        this.port = port;
    }

    public void start() throws InterruptedException {
        NioEventLoopGroup bossGroup = new NioEventLoopGroup(1);
        NioEventLoopGroup workerGroup = new NioEventLoopGroup();
        try {
            ServerBootstrap bootstrap = new ServerBootstrap();
            bootstrap.group(bossGroup, workerGroup)
                    .channel(NioServerSocketChannel.class)
                    .childHandler(new ChannelInitializer<SocketChannel>() {
                        @Override
                        protected void initChannel(SocketChannel sc) {
                            ChannelPipeline pipeline = sc.pipeline();
                            pipeline.addLast(new ObjectEncoder());
                            pipeline.addLast(new ObjectDecoder(ClassResolvers.cacheDisabled(null)));
                            pipeline.addLast(new ServerHandler());
                        }
                    });
            ChannelFuture cf = bootstrap.bind(port).sync();
            cf.channel().closeFuture().sync();
        } finally {
            bossGroup.shutdownGracefully();
            workerGroup.shutdownGracefully();
        }
    }
}
ServerHandler
- 클라이언트로부터 받은 데이터(msg)가 Person 타입이거나 Person 타입의 하위 클래스일 경우 로그를 남기는 서버 핸들러
public class ServerHandler extends ChannelInboundHandlerAdapter {

    @Override
    public void channelRead(ChannelHandlerContext ctx, Object msg) {
        if (msg instanceof Person) {
            Person person = (Person) msg;
            System.out.println("[SERVER] person = " + person);
        }
    }

    @Override
    public void exceptionCaught(ChannelHandlerContext ctx, Throwable cause) {
        cause.printStackTrace();
        ctx.close();
    }
}
MyClient
- 생성자로 전달받은 host와 port를 가진 서버에 연결
- 생성자로 전달받은 name과 age를 ClientHandler 생성자에 넣어 호출
public class MyClient {

    private final String host;
    private final int port;

    private final String name;
    private final int age;

    public MyClient(String host, int port, String name, int age) {
        this.host = host;
        this.port = port;
        this.name = name;
        this.age = age;
    }

    public void connect() throws InterruptedException {
        NioEventLoopGroup group = new NioEventLoopGroup();
        try {
            Bootstrap bootstrap = new Bootstrap();
            bootstrap.group(group)
                    .channel(NioSocketChannel.class)
                    .handler(new ChannelInitializer<SocketChannel>() {
                        @Override
                        protected void initChannel(SocketChannel sc) {
                            ChannelPipeline pipeline = sc.pipeline();
                            pipeline.addLast(new ObjectEncoder());
                            pipeline.addLast(new ObjectDecoder(ClassResolvers.cacheDisabled(null)));
                            pipeline.addLast(new ClientHandler(name, age));
                        }
                    });
            ChannelFuture cf = bootstrap.connect(host, port).sync();
            cf.channel().closeFuture().sync();
        } finally {
            group.shutdownGracefully();
        }
    }
}
ClientHandler
- 전달받은 name과 age를 가진 Person 객체를 생성하여 서버에게 객체 전송
public class ClientHandler extends ChannelInboundHandlerAdapter {

    private final String name;
    private final int age;

    public ClientHandler(String name, int age) {
        this.name = name;
        this.age = age;
    }

    @Override
    public void channelActive(ChannelHandlerContext ctx) {
        Person person = new Person(name, age);
        ctx.writeAndFlush(person);
        System.out.println("[CLIENT] 서버에게 객체 전송: " + person.getName());
    }

    @Override
    public void exceptionCaught(ChannelHandlerContext ctx, Throwable cause) {
        cause.printStackTrace();
        ctx.close();
    }
}
ServerApp
- localhost:8080 서버 시작
public class ServerApp {
    public static void main(String[] args) throws InterruptedException {
        new MyServer(8080).start();
    }
}
ClientApp
- 3개의 클라이언트 쓰레드가 서버와 연결
public class ClientApp {
    public static void main(String[] args) throws InterruptedException {
        Thread client1 = new Thread(() -> {
            try {
                new MyClient("localhost", 8080, "A", 10).connect();
            } catch (InterruptedException e) {
                throw new RuntimeException(e);
            }
        });

        Thread client2 = new Thread(() -> {
            try {
                new MyClient("localhost", 8080, "B", 20).connect();
            } catch (InterruptedException e) {
                throw new RuntimeException(e);
            }
        });

        Thread client3 = new Thread(() -> {
            try {
                new MyClient("localhost", 8080, "C", 30).connect();
            } catch (InterruptedException e) {
                throw new RuntimeException(e);
            }
        });

        client1.start();
        client2.start();
        client3.start();

        client1.join();
        client2.join();
        client3.join();
    }
}
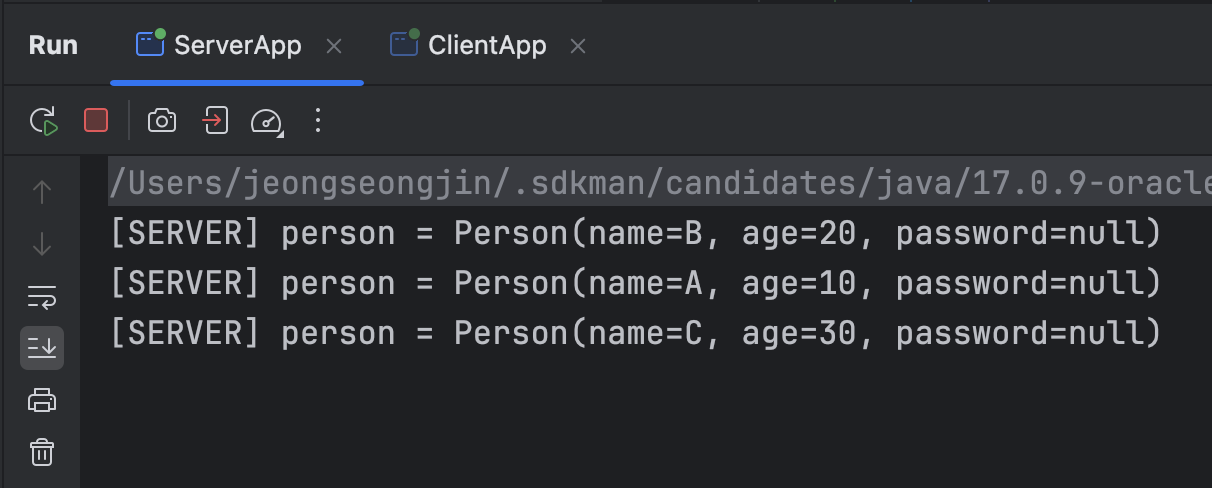
실행 결과
- 객체를 TCP 네트워크 상에서 주고 받는 간단한 예제였다.

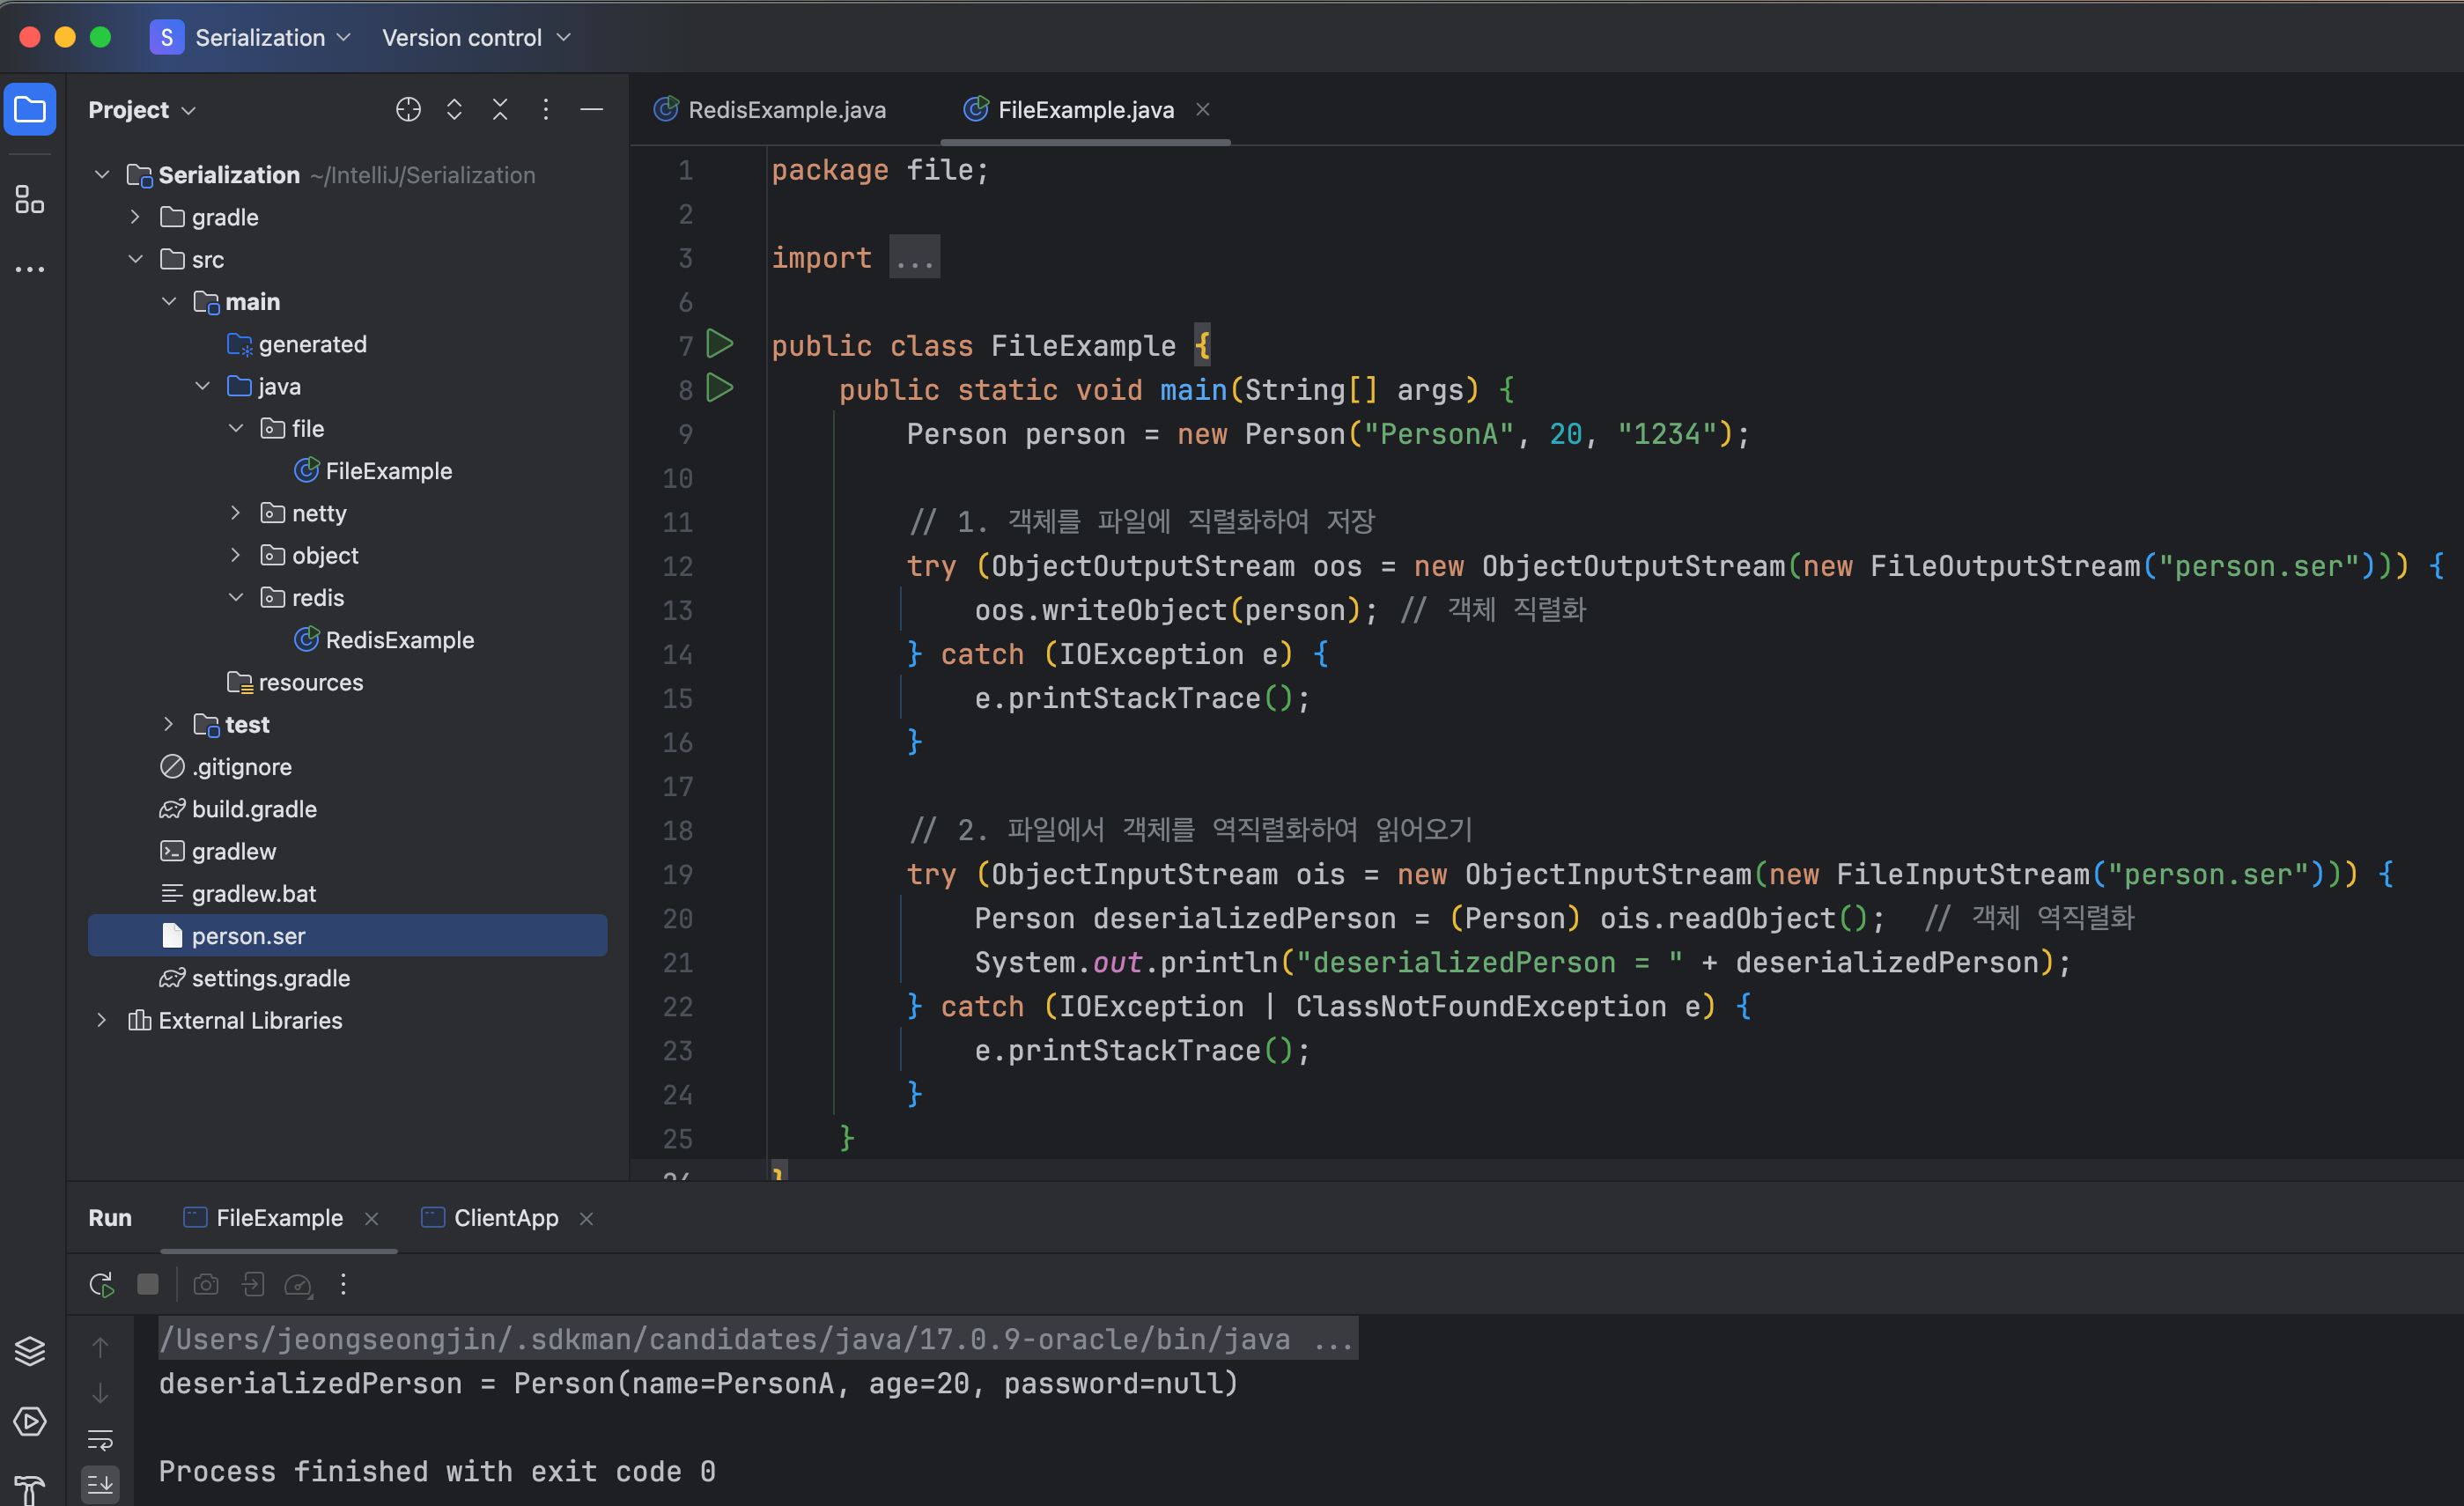
(2) File
FileExample.java
public class FileExample {
    public static void main(String[] args) {
        Person person = new Person("PersonA", 20, "1234");

        // 1. 객체를 파일에 직렬화하여 저장
        try (ObjectOutputStream oos = new ObjectOutputStream(new FileOutputStream("person.ser"))) {
            oos.writeObject(person); // 객체 직렬화
        } catch (IOException e) {
            e.printStackTrace();
        }

        // 2. 파일에서 객체를 역직렬화하여 읽어오기
        try (ObjectInputStream ois = new ObjectInputStream(new FileInputStream("person.ser"))) {
            Person deserializedPerson = (Person) ois.readObject();  // 객체 역직렬화
            System.out.println("deserializedPerson = " + deserializedPerson);
        } catch (IOException | ClassNotFoundException e) {
            e.printStackTrace();
        }
    }
}
실행 결과
- 좌측 파일 목록에 person.ser 파일이 생성된 것을 확인할 수 있다.
- person 객체 생성 시 비밀번호를 1234로 하여 생성했지만 역직렬화한 객체를 확인한 결과를 보니 null로 되어 있는 것을 확인할 수 있다. (transient 키워드 사용)
(3) Redis
RedisExample.java
- Jedis 라이브러리 사용
public class RedisExample {
    public static void main(String[] args) {
        // Redis에 연결
        try (Jedis jedis = new Jedis("localhost", 6379)) {
            // 1. 객체 생성
            Person person = new Person("Person_Redis", 30);

            // 2. 객체를 직렬화하여 바이트 배열로 변환
            byte[] serializedPerson = serialize(person);

            // 3. Redis에 직렬화된 객체 저장
            jedis.set("person".getBytes(), serializedPerson);

            // 4. Redis에서 바이트 배열로 객체 읽어오기
            byte[] personData = jedis.get("person".getBytes());

            // 5. 바이트 배열을 역직렬화하여 객체로 복원
            Person deserializedPerson = (Person) deserialize(personData);
            System.out.println("Redis에서 가져온 객체: " + deserializedPerson);
        }
    }

    // 객체를 직렬화하여 바이트 배열로 변환하는 메서드
    public static byte[] serialize(Object obj) {
        try (ByteArrayOutputStream bos = new ByteArrayOutputStream();
             ObjectOutputStream oos = new ObjectOutputStream(bos)) {
            oos.writeObject(obj);
            return bos.toByteArray();
        } catch (IOException e) {
            e.printStackTrace();
        }
        return null;
    }

    // 바이트 배열을 객체로 역직렬화하는 메서드
    public static Object deserialize(byte[] data) {
        try (ByteArrayInputStream bis = new ByteArrayInputStream(data);
             ObjectInputStream ois = new ObjectInputStream(bis)) {
            return ois.readObject();
        } catch (IOException | ClassNotFoundException e) {
            e.printStackTrace();
        }
        return null;
    }
}
실행 결과
- 객체를 직렬화하여 캐시에 저장하고 다시 읽어와 역직렬화까지 잘되는 것을 확인할 수 있었다.

3. 직렬화 관련 주요 Exception
- NotSerializableException : 객체를 직렬화 할 때, 그 클래스가 Serializable 인터페이스를 구현하지 않은 경우 발생
- InvalidClassException
- 직렬화된 객체를 역직렬화 할 때 클래스의 serialVersionUID가 맞지 않는 경우 발생
- 멤버 변수의 타입이 달라졌을 때 발생. 예를 들어 int 타입 age의 Person 객체를 직렬화한 person.ser 파일이 이미 존재할 때, Person 클래스의 age 변수 타입을 long으로 변경하고 person.ser 파일을 역직렬화 할 때 해당 예외가 발생한다.
- Serializable 인터페이스를 구현하지 않은 상위 클래스를 상속받은 하위 클래스가 Serializable 인터페이스를 구현한 경우, 역직렬화 시 상위 클래스의 생성자가 호출되어 초기화된다. 이때 호출하는 상위 클래스의 생성자는 기본 생성자로, 상위 클래스에 기본 생성자가 존재하지 않으면 해당 예외가 발생한다.
직렬화는 언뜻 보면 많은 이점이 있을 것 같다. 자바 객체를 바이트 스트림으로 변환하여 다른 곳에서 쉽게 주고받을 수 있다는 점은 큰 장점이다. 또한 대부분의 참조 변수, 예를 들어 컬렉션 같은 타입도 직렬화할 수 있다는 점은 유용하게 사용될 수 있다. 하지만, 직렬화에는 신중한 고민이 필요하다. 직렬화된 바이트 스트림은 데이터 용량이 상대적으로 크며, 한 번 직렬화된 객체 파일이 여러 곳에서 사용되기 시작하면, 해당 클래스의 구조를 쉽게 변경하기 어려워진다. 이로 인해 유지보수가 복잡해질 수 있다. 또한, 보안 측면에서 직렬화는 취약할 수 있다. 특히 역직렬화 시 악의적인 사용자가 데이터를 조작해 공격할 위험이 있다. 이 외에도 직렬화에는 많은 단점들이 존재한다. 그렇기 때문에 직렬화를 사용할 때는 그 이점과 단점을 잘 따져보고 신중하게 결정해야 한다.